Artisan Sourdough Bread
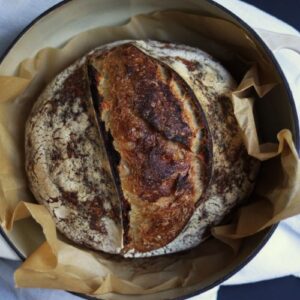
From the rustic crackle of the golden crust to the tangy, complex flavors of the crumb, sourdough is more than just bread—it’s an experience. Unlike store-bought loaves, sourdough relies on a natural fermentation process, creating a unique taste and texture that can’t be replicated.
Equipment
- 1 Glass mixing bowl
- 1 Kitchen Scale
- 1 Dough whisk or use a wet hand
- 1 Bread lame
- 1 Silicone sling or parchment paper
- 1 Tea towel
- 1 Bread knife
Ingredients
- 100 Grams Active sourdough starter
- 330 Grams Warm water
- 500 Grams Unbleached all purpose flour
- 10 Grams Sea salt Or pink Himalayan salt
I earn a commission from Instacart from qualifying purchases.
Instructions
Making the dough
- Place your mixing bowl on your kitchen scale and tare it so that the scale reads 0 grams. Pour 100 grams of sourdough starter into the bowl. Your starter should be active and have been fed in at least the previous 24 hours.100 Grams Active sourdough starter
- Next, tare your scale again until it reads 0 grams and add approximately 330 grams of warm water to the bowl. A few grams off is fine, no need to worry. Mix until the starter and water are well combined.330 Grams Warm water
- Then, set your scale so that it reads 0 grams again and add 500 grams of flour to the bowl. Fold the flour into the mixture with a silicone spatula until it forms a shaggy-looking dough ball. This can take a few minutes to come together. Once it has, cover the bowl with a damp tea towel and let it rest for 30 minutes on the counter.500 Grams Unbleached all purpose flour
- After resting, place your mixing bowl back onto the kitchen scale and tare it until it reads 0 grams one last time. Add 10 grams of sea salt to the bowl and fold it into the dough until it's well incorporated. Again, this can take a few minutes. Afterward, cover the bowl with the damp tea towel and place in a warm area for 40 minutes.I place the bowl into my oven with the light on because it creates an environment that is slightly warm, but not too warm.10 Grams Sea salt
Stretch and folds
- Now, you're going to do your first stretch and fold. The dough is a circle, but treat it like a square with four sides. You want to stretch and fold each side once. That's it. Then cover it with the teal towel again and place it back into a warm environment for another 40 minutes.
- Now, do the second stretch and fold. Then, cover the dough again with a damp tea towel and place into a warm environment for another 40 minutes.
Coil folds
- Then, you're going to do your first coil fold. Similar to the stretch and fold, you will work your way around the dough as if it has four sides. But the point here is to not stretch the dough as much as you would with a stretch and fold. You are more so folding the dough onto itself a total of four times. See video below. Then again, cover the bowl with the tea towel and place into a warm environment for another 40 minutes.
- Do a second coil fold, cover your dough and place in a warm environment for 40 more minutes.
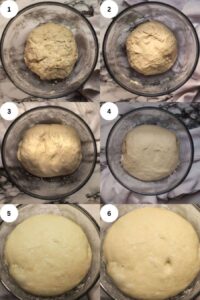
- Now, do the last coil fold (optional), cover the bowl and place back into the warm environment for 2-6 hours (depending on the temperature this could take longer) to continue to bulk ferment. I usually check on the dough every hour or so from here. When bulk fermentation is done, the dough should be puffy, pretty giggly when you gently shake the bowl, and should mostly pop back when gently poked with a finger.
See photos for reference on the steps up to this point
- Photo 1 - the dough after its first stretch and fold
- Photo 2 - the dough after its second stretch and fold
- Photo 3 - the dough after the first coil fold
- Photo 4 - the dough after its second coil fold
- Photo 5 - the dough after 3 or so hours of bulk fermentation
- Photo 6 - the dough's poke test result
Shaping the dough
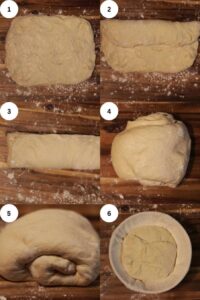
- Next, scrape the dough out onto a lightly floured surface. Lightly stretch the dough into a rectangle about 12 × 10 inches. Pull the top half down like folding a paper to fit into an envelope. Then fold the bottom half up and over the top half. See photos below.
- Now, roll the dough up from left to right.
- Then, gently rotate and pull the dough ball across the counter towards you. This helps to create tension in the dough and close up the ends.
- Generously flour a banneton basket and place the dough into it with the seam side up. Cover with a damp tea towel and place into the fridge overnight for it's cold retard.
The next morning
- In the morning, preheat your oven to 500° F with the Dutch oven inside. Once your oven is up to temperature, remove your dough from the fridge. Dump the loaf onto a piece of parchment paper or a silicone baking mat (this is what I use) and score the dough. Then place the dough into your preheated Dutch oven and place the lid on.
- Place your Dutch oven on the center rake of your oven and turn the temperature down to 450° F and bake covered, for 40 minutes.
- Turn your oven temperature down to 425° F and bake covered, for another 20 minutes.
- Remove your Dutch oven from your oven and immediately remove your loaf from the pan to cool.
- I recommend waiting an hour or so before cutting your bread to get a good read on the crumb quality. But I also totally understand the universal love of warm bread and butter and am guilty of cutting into it sooner! You do you, and enjoy!
Notes
Storage recommendations
Store cooled bread at room temperature in an airtight bag or container (I prefer a glass cake stand with a lid), cut side down for 3-4 days. Slice and toast in an oven as desired. If you haven't finished a loaf and are worried about it going bad or if it's already gone stale, you could bag it and put it into a freezer. Then you're able to make homemade bread crumbs anytime you need in the future!


